Common Mistakes When Planning A Compact Laundry Setup With Better Drying Space
A practical step-by-step guide to common mistakes when planning a compact laundry setup with better drying space, including preparation, instructions, common issues, tips, and next steps.
Common Mistakes When Planning A Compact Laundry Setup With Better Drying Space
Planning a compact laundry setup with better drying space requires careful thought about airflow, appliance placement, and workflow. Common mistakes include squeezing the washer and dryer too close together, blocking vents, ignoring ceiling or wall space, and forgetting about humidity control. This guide helps you avoid those pitfalls so your laundry area dries clothes faster and stays mold-free.
Fast Answer
- Measure your space and plan for at least 15 inches of clearance in front of the dryer for loading and airflow.
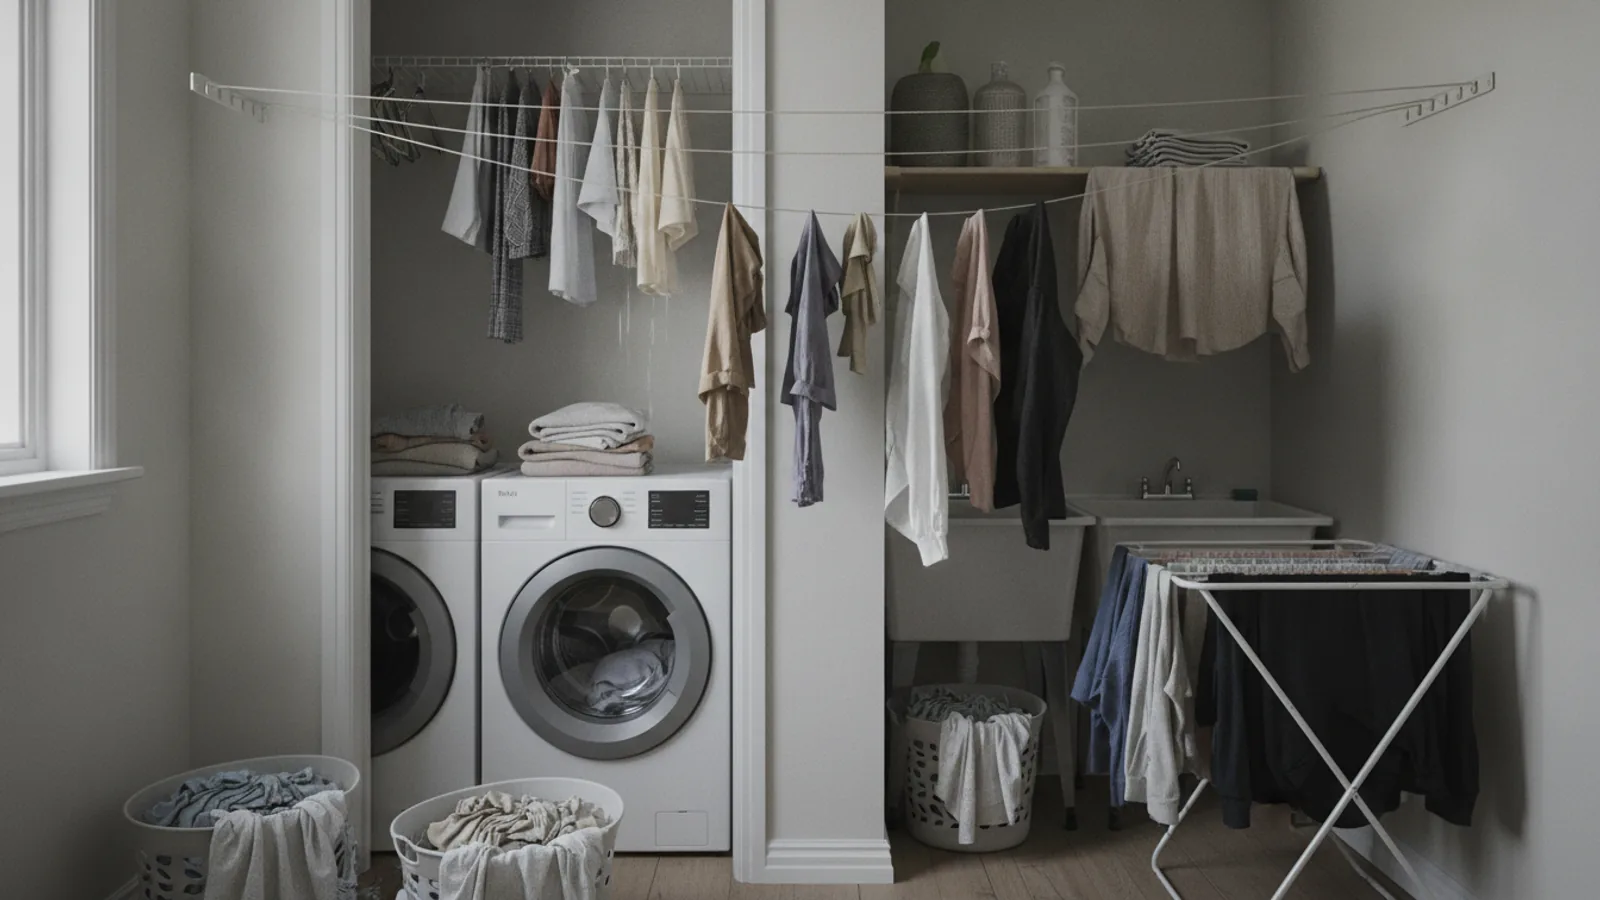
- Use vertical space with fold-down drying racks or a ceiling-mounted pulley system to increase drying area without using floor space.
Before You Start
- Measure the length, width, and height of your laundry area, noting the location of doors, windows, and electrical outlets.
- Identify the best spot for the dryer considering venting options, such as an exterior wall or a ventless model if ducting is impossible.
- List all items you need to dry, including delicates, bulky bedding, and everyday clothes, to determine the types of drying surfaces you need.
- Check the humidity level in the room and decide if you need a dehumidifier or improved ventilation to prevent moisture buildup.
Step-by-Step Instructions
Measure Every Dimension and Clearance
Start by measuring the width, depth, and height of the space where you plan to place the washer and dryer. Include the area needed for opening doors and drawers. For a front-loading dryer, you need at least 15 inches of clearance in front to load and unload comfortably. Also measure the swing radius of the door to ensure it can fully open without hitting the wall or other appliances. Leave at least 1 inch of space between the dryer and the wall for venting and cord clearance. Check the ceiling height if you plan to install a drying rack above the machines. Make a note of all these dimensions on paper. This initial planning prevents the common mistake of buying appliances that are too big or placing them too close to walls.
Ensure Proper Ventilation for the Dryer
Check the venting requirement for your dryer type. A vented dryer needs a rigid or flexible metal duct that leads outdoors. Measure the distance from the dryer to the outside vent; keep it as short and straight as possible. Avoid using long plastic ducts or pushing the dryer too close to the wall, which can crush the duct. For a ventless dryer, you do not need an exterior duct, but you must have enough airflow in the room. Place a dehumidifier or an exhaust fan nearby to remove moisture from the air. After installation, run the dryer on a low-heat cycle and feel the vent airflow at the outside exit. If the airflow is weak, check for kinks or blockages. Poor ventilation leads to longer drying times, higher energy use, and a humid environment that promotes mold growth.
Create a Dedicated Drying Zone
Designate a specific area in your laundry room for drying clothes that need to air-dry. This zone should include a sturdy drying rack or a wall-mounted fold-down rack. If floor space is limited, install a ceiling-mounted pulley system, also called a clothesline, over the washer or dryer. Ensure the rack or line is at least 2 feet away from the wall to allow air to circulate around the clothes. Place the drying zone near a window or a ventilation fan to improve airflow. When hanging clothes, space them at least 1 inch apart to speed up drying. Check the labels on your clothes to see which items can be air-dried and which must go in the dryer. A dedicated drying zone prevents the common mistake of piling wet clothes on radiators or chairs, which blocks heat and causes musty odors.
Position Shelves and Cabinets Wisely
Install shelves or cabinets above the washer and dryer for storing laundry supplies and folded clothes. However, do not cover the dryer vent area or block the top of the machines if they need ventilation. Keep at least 6 inches of space above the dryer if it is a vented model. Place shelves high enough so that you can easily reach them without a step stool, but not so high that they interfere with the dryer's door opening. Use sturdy brackets that can hold the weight of detergent bottles and other items. When you mount shelves, ensure they are level and do not obstruct the path from the door to the machines. A well-planned storage area reduces clutter and keeps supplies off the floor, but poor placement can block airflow or cause bending and reaching problems. Check that the shelves are securely attached to the wall studs.
Plan the Workflow from Wash to Dry
Arrange your appliances and accessories in a sequence that follows the natural flow of doing laundry. Place the washer and dryer side by side or stacked, with a clear path from the washer to the dryer. If you have a separate drying rack, position it nearby so that you can transfer items quickly without crossing the room. Make sure there is enough counter space to sort and fold clothes. A good plan is to have a surface that can be used for folding and sorting near the dryer. Mark the locations of hampers and dirty laundry bins to keep the flow smooth. Avoid placing the machines on opposite sides of the room, which wastes steps and increases the chance of dropping clothes. Test the flow by imagining you are doing a load: from the hamper to the washer, then to the dryer, and finally to the folding area. Adjust the arrangement if any steps require awkward reaching or walking.
Add a Dehumidifier or Ventilation Fan
In a compact laundry area, moisture control is essential for speed drying and preventing mold. Install a dehumidifier or an exhaust fan to remove humidity from the air. Place the dehumidifier near the drying rack or in the center of the room, ensuring it has clearance for airflow. If using a fan, position it so that it blows air across the drying clothes. For a vented dryer, run an exhaust fan at the same time to help expel humid air. If you have a ventless dryer, the room should have a dedicated ventilation system. Check the relative humidity in the room with a simple hygrometer. Ideally, keep it below 60%. During drying, turn on the dehumidifier or fan and keep the door to the rest of the house closed to contain the moisture. This step prevents condensation on walls and windows, which can lead to mold growth and slow drying due to high humidity.
Quick Reference
| Situation | Action | Why it helps |
|---|---|---|
| You have a small room and no floor space for a drying rack. | Install a ceiling-mounted pulley clothesline or a wall-mounted fold-down rack that folds flat when not in use. | This maximizes vertical space and keeps the floor clear, allowing better airflow and easier movement. |
| You notice clothes take a long time to dry and feel damp even after air-drying. | Measure the room's humidity with a hygrometer and run a dehumidifier during the drying process. | High humidity slows down evaporation; reducing it speeds up drying and prevents musty smells. |
| The dryer vent duct is long and bent, causing weak airflow. | Shorten the duct to the straightest possible path and replace any accordion-style duct with a smooth metal pipe. | Shorter and straighter ducts reduce airflow resistance, improving dryer efficiency and reducing fire risk. |
Common Issues
- The dryer's exhaust vent is blocked by placing the dryer too close to the wall.: Pull the dryer away from the wall to leave at least 2 inches of space behind it, and regularly clean the vent duct to prevent lint buildup.
- Drying clothes on a portable rack that takes up the entire floor and blocks the doorway.: Use a wall-mounted or ceiling-mounted drying solution that folds away, or choose a rack that can be stored vertically when not in use.
- The laundry room has poor ventilation, leading to condensation and mold on the ceiling.: Install an exhaust fan or a dehumidifier, and always leave the door open when drying clothes to allow air exchange.
Advanced Tips
- Consider using a drying rack that attaches over a door or a shower rod, but be sure to check the door's weight capacity and the rod's strength.
- Place a hygrometer in your laundry room to monitor humidity levels; if it stays above 60% for several hours, you need better ventilation.
- Use a thin, high-velocity fan aimed at the drying rack to create a wind-chill effect that can cut drying time by up to 30%.
Final Checklist
- Measure the space and verify that there is at least 15 inches of clearance in front of the dryer and 2 inches behind it for venting.
- Check the dryer vent path and clean the lint filter before every load; replace the duct if it is kinked or more than 8 feet long.
- Install a dehumidifier or exhaust fan that can reduce humidity below 60% in the laundry area during drying.
- Set up a drying rack that uses vertical or wall space, leaving the floor clear for movement and airflow.
FAQ
Can I place a dryer in a closet without any venting?
No, a vented dryer requires an exterior vent to expel moisture and heat. If you cannot vent outside, choose a ventless dryer that condenses water into a tank or drains it away. However, even ventless dryers need sufficient airflow in the room, so install a small ventilation fan or use a dehumidifier to keep humidity levels down.
What is the best way to dry clothes quickly in a small space?
Use a combination of a dehumidifier to reduce humidity, a fan to create airflow, and a drying rack with adequate spacing between garments. Hang clothes on a line or rack that allows air to circulate around them. Also, wring out clothes well before hanging, and avoid overloading the rack, as this traps moisture and slows drying.
How much clearance do I need around the dryer for safety?
Leave at least 1 inch of space on the sides and back for ventilation, and at least 15 inches in front for loading and maintenance. For vented dryers, the duct should not be bent sharply or compressed against the wall. Always follow the manufacturer's clearance recommendations in the manual, and keep the area free of flammable items.